Ceiling medallions are a great way to add some architectural interest to your ceilings and fixtures. Sure, you can add a ceiling medallion ‘as is’ to a chandelier, fan or pendant light fixture, but why not give it some personality and really enhance the design?

The above ceiling medallion is a fairly decent size at 28 inches across, and was purchased to use with an antique gas light, wired with electric bulbs. I wish I had taken a photo of it! Art Deco style in deep bronze with some brass highlights and some stained glass added for interest. The chevrons and panels of flowers and fruit in this medallion are a great choice to really set the fixture off.
In meeting with the client, we determined that the gold colors in the glass would make a great glaze color for the ceiling medallion to bring out the detail without overpowering the light fixture and feeling heavy. I brought the ceiling medallion back to the studio to work on over the next few days.

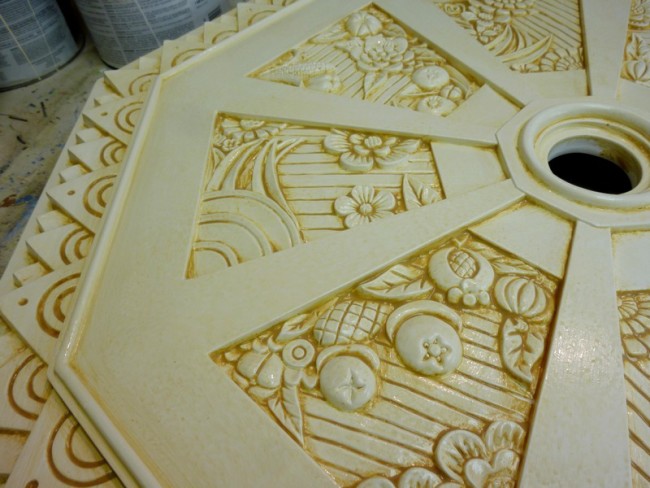
After doing a bit of touch-up and applying a good primer coat, the entire ceiling medallion was base-coated using a creamy white latex paint. I use a chip brush or an old brush for this to really scrub the paint into all the crevices of the design, then smooth out the surface with the brush. The paint tends to build up in the corners, so I make sure to pull the excess out before it dries.

After allowing the base-coat to dry overnight, I mixed up a glaze using a medium gold shade of paint that coordinated with the stained glass and latex glaze, about 3 parts glaze, one part paint. The glaze gets scumbled on with a chip brush to get it into the crevices and details, then is wiped off the higher areas to bring out the detail. I took care not to leave brush or wipe marks on the flat surfaces, feeling those would be distracting from the carved details. I worked my way around the ceiling medallion until I had everything just right.

After allowing the glaze to dry, I checked it to see if any touch-ups were needed before sealing it with a water-based flat polyurethane. In applying the sealer, care again needs to be taken to avoid build-ups of the liquid in corners and to get a good even coat.

I think it turned out great, don’t you? They loved it, and I can’t wait to see it installed when I go back to discuss window treatment options with them soon.
Here’s more about finishing ceiling medallions: Attention to Detail and Metallic Medallions
Hi Ellen – I am a decorative artist/designer on Long Island. Found you via Regina Garay’s blog. I have done many of these medallions for clients (love doing them!). Can you tell me where you purchased this one? I have never seen this design before and I thought I had seen just about all of them.
Great job.
Hope you come visit my blog as well.
Linda
Thanks! My client provided the medallion, so I can’t tell you where they got it, sorry!
Ellen – I love the ceiling medallion idea, and your artistic creation is beautiful!